Oh man.
It’s the end of March and I am just now getting around to writing about last year’s Halloween endeavor. We’ve been so busy the past few months and this thing has just hopped from one back burner to another this whole time. Enough is enough.
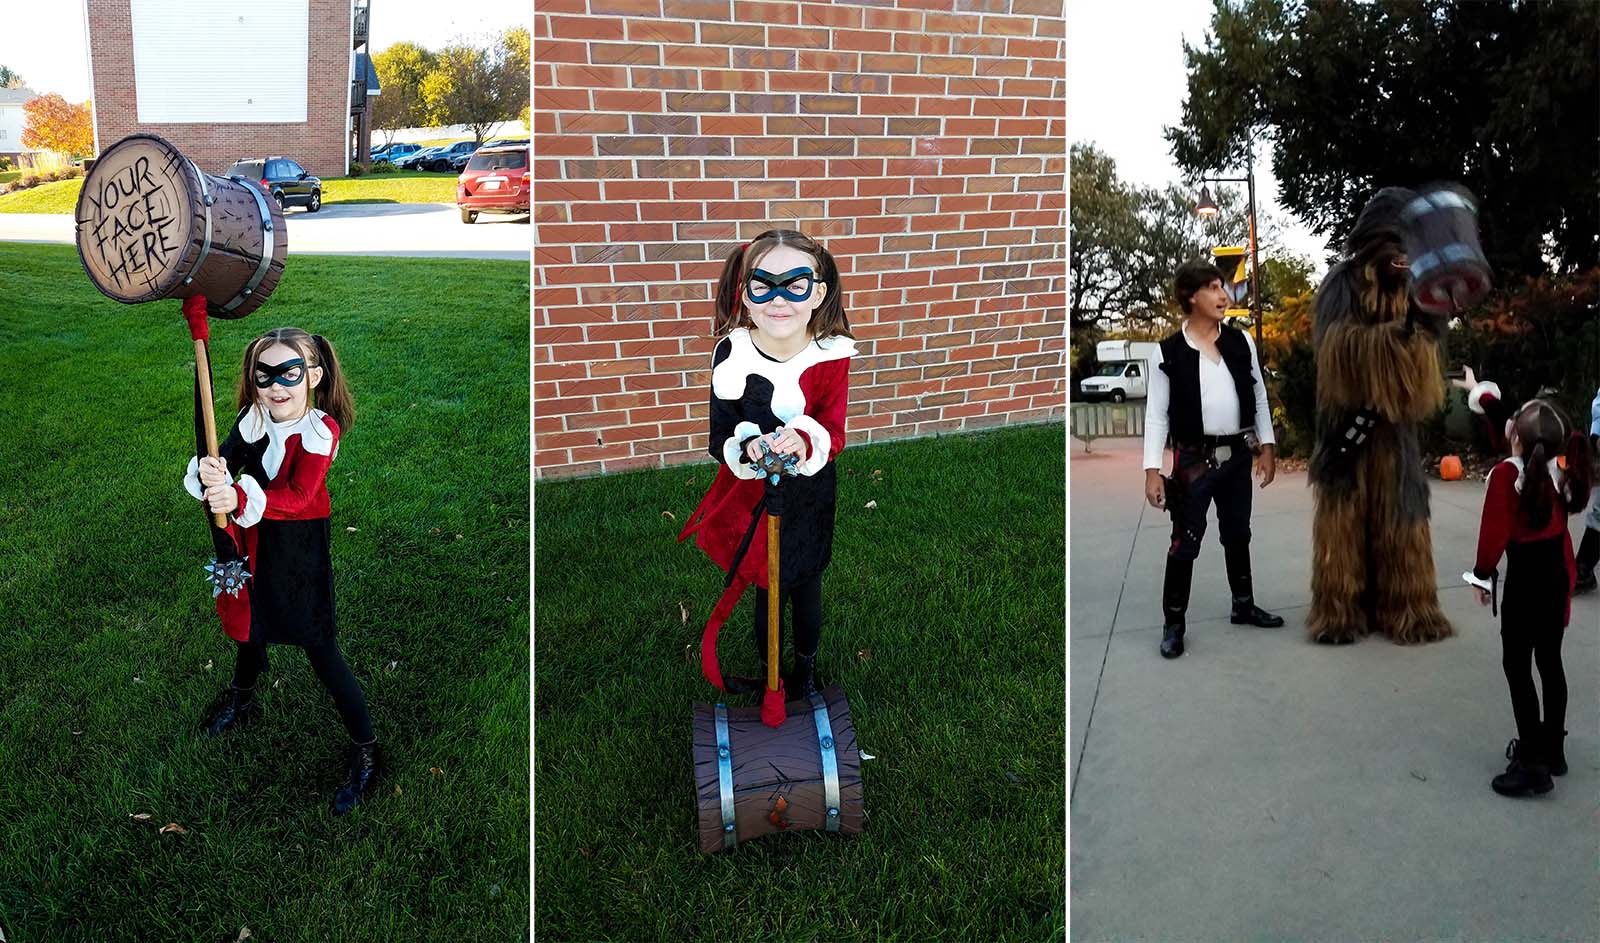
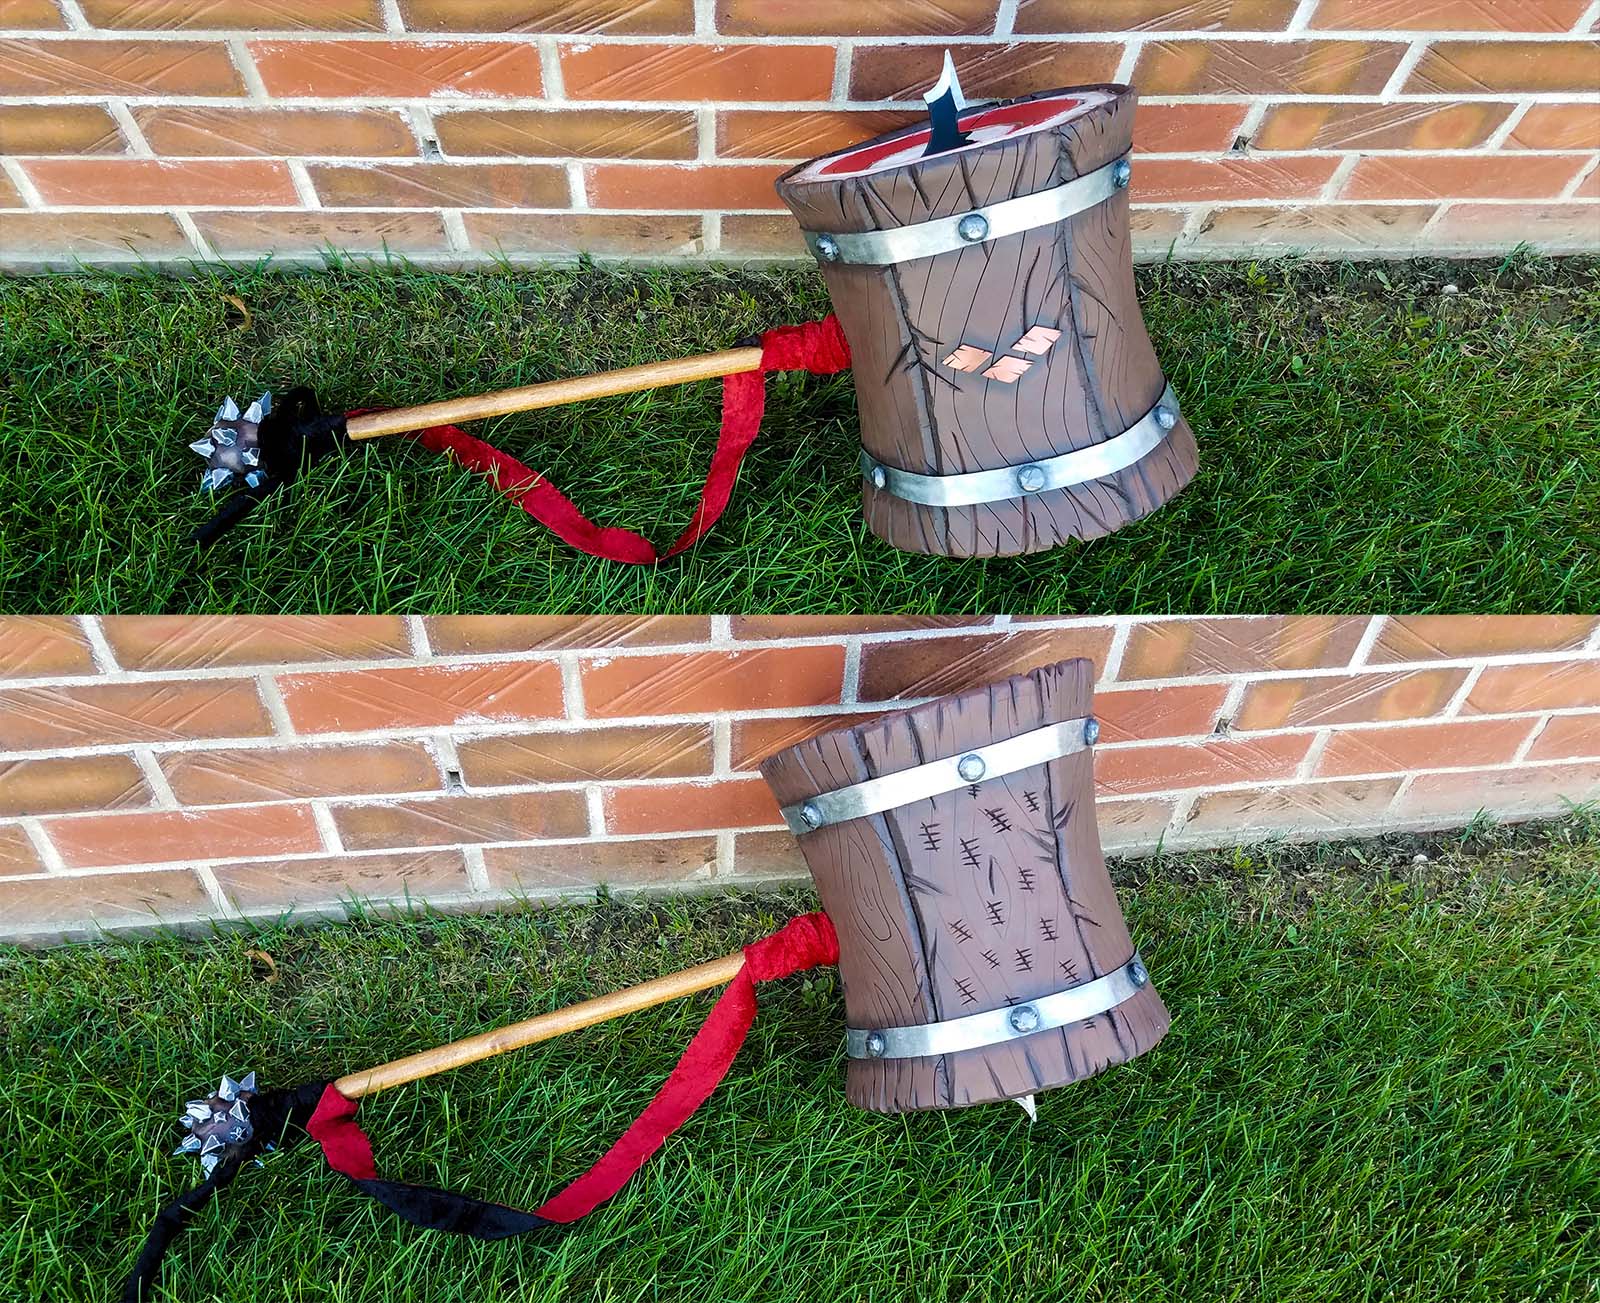
So, my daughter (like seemingly every other girl in the world) decided she wanted to be Harley Quinn for Halloween. After spending a bit of time figuring out how we were going to manage this task *tastefully*, I went out to Amazon, bought a bunch of stuff, and got to work. I started research with the hammer prop and looked at everything I could find. I wanted something that was going to be a bit more raw than the comic book mallet that the character typically has and was quite happy when I happened across Eric Haltom’s template files out on Jack of All. I was looking for something drastically different in the paint department, but this template definitely saved me from wasting time in trial and error trying to form my own. Go check his site out if you get the chance!

*Note – Due to my wife’s work we had to move on the day after Halloween… so this entire project had to be juggled on top of packing up our entire apartment. Not a lot of time for errors and setbacks!
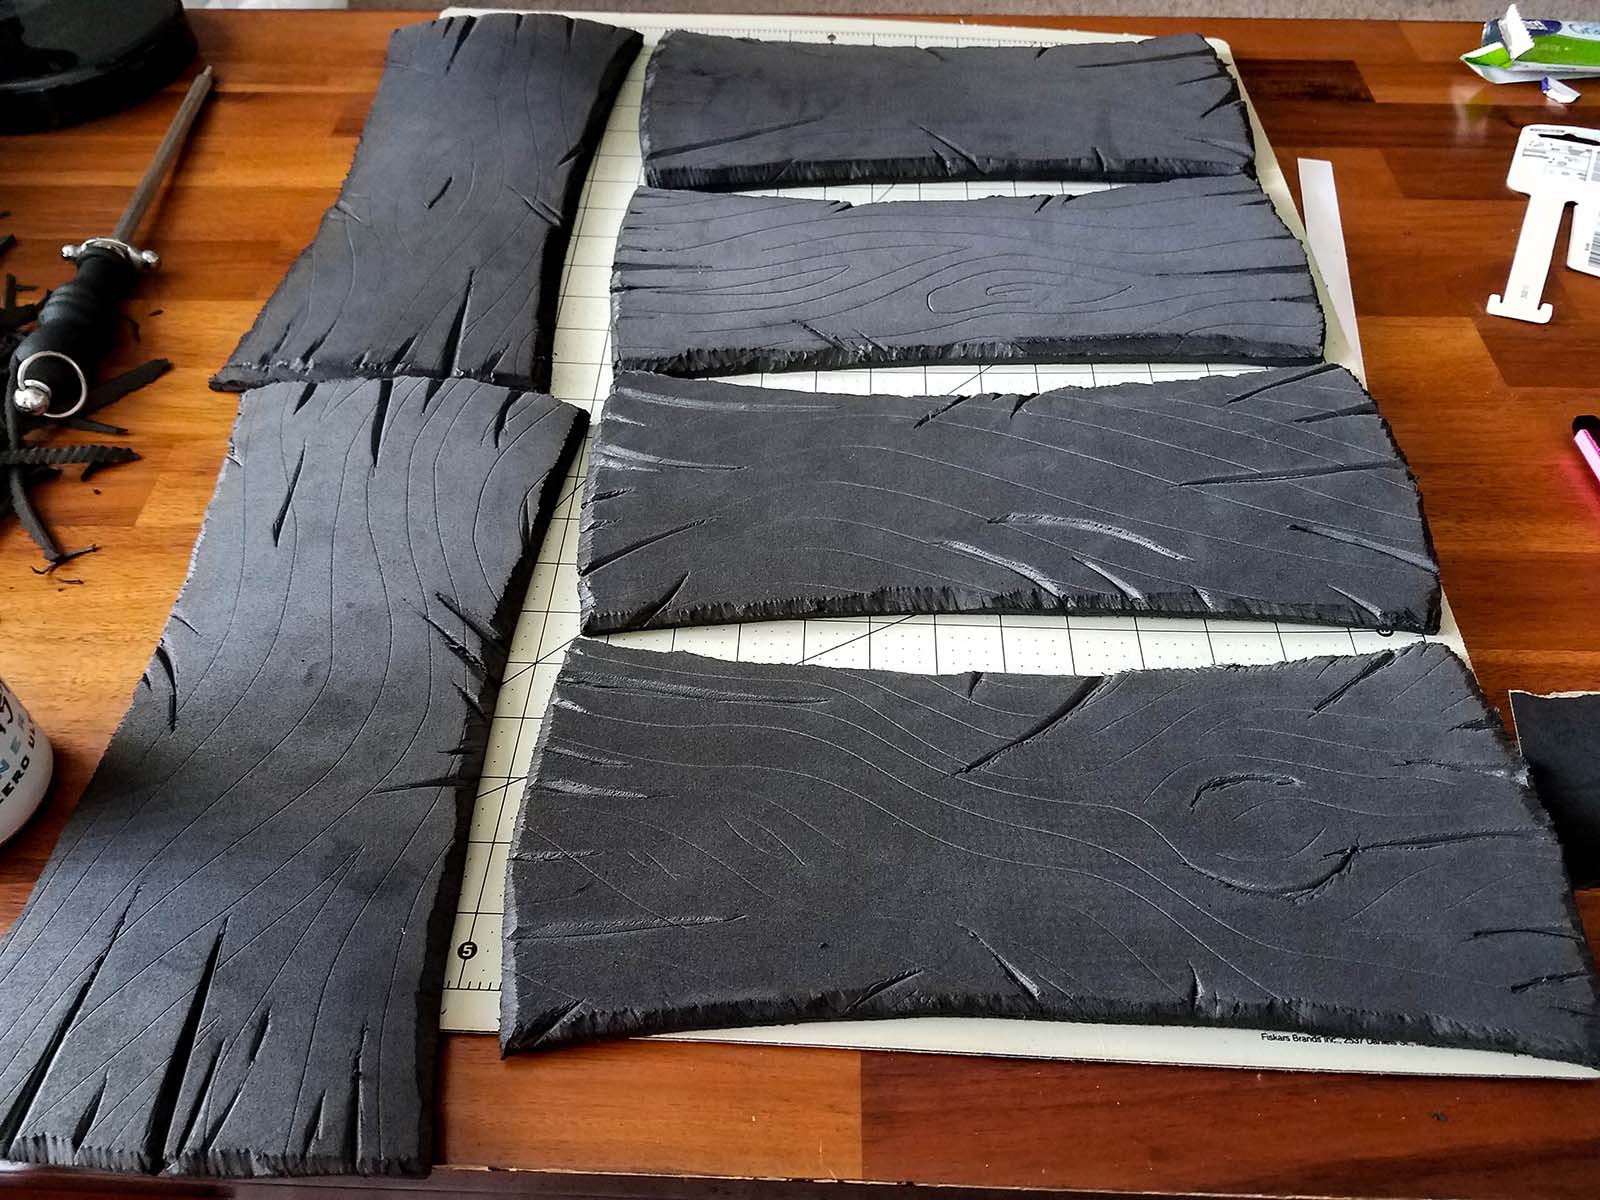
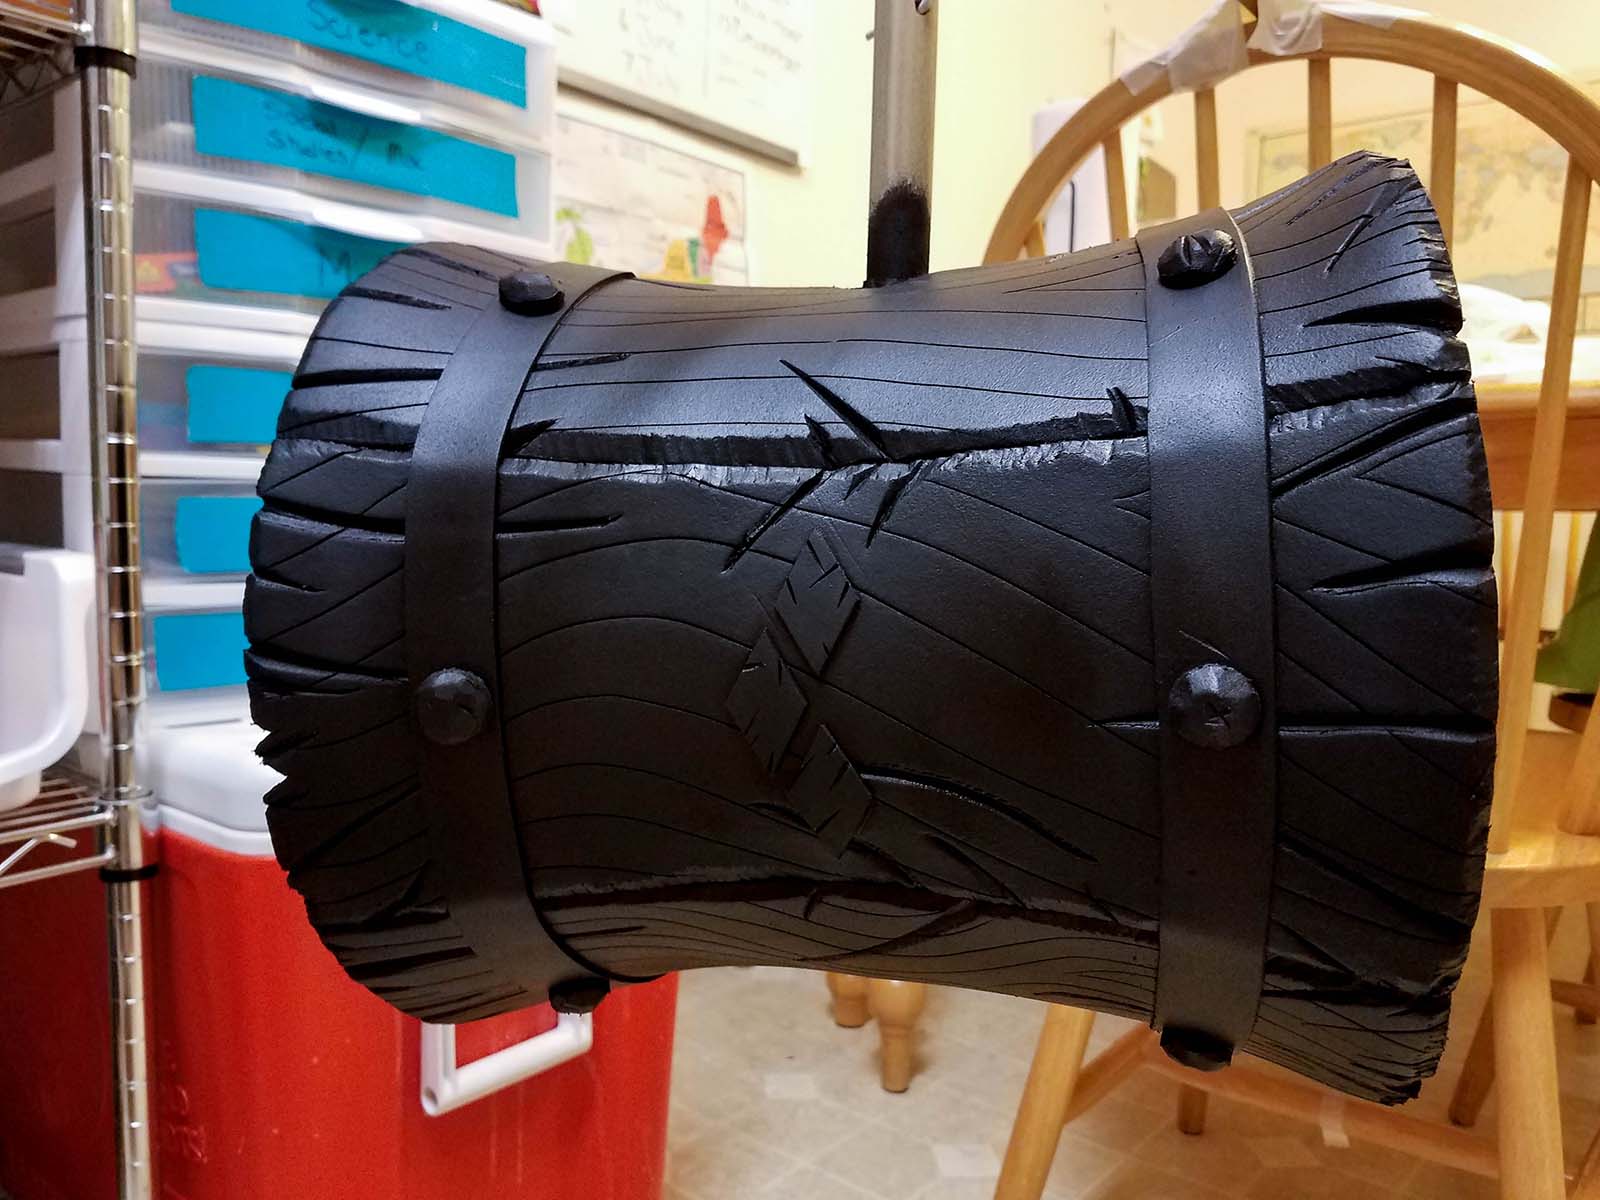
So, after getting all the pieces liberated from the EVA floor mats, I set about trying to make them look like rough planks of wood. The majority of this work (the grain, gouges, and general shaping) was simply done with a razor blade, and then each piece was hit with my heat gun. This causes the cuts in the foam to open up and greatly enhances the amount of detail on the surface. I was a bit fearful of going overboard initially, so I took it slow. Made some cuts, hit it with the heat gun. Made a few more cuts, back to the heat gun. Eventually I said screw it and just went all over each piece making deep gouges and cuts all over the place. I tried my best to add the same basic amount of cuts to each plank so that none of them stood out as too plain or too gnarly.
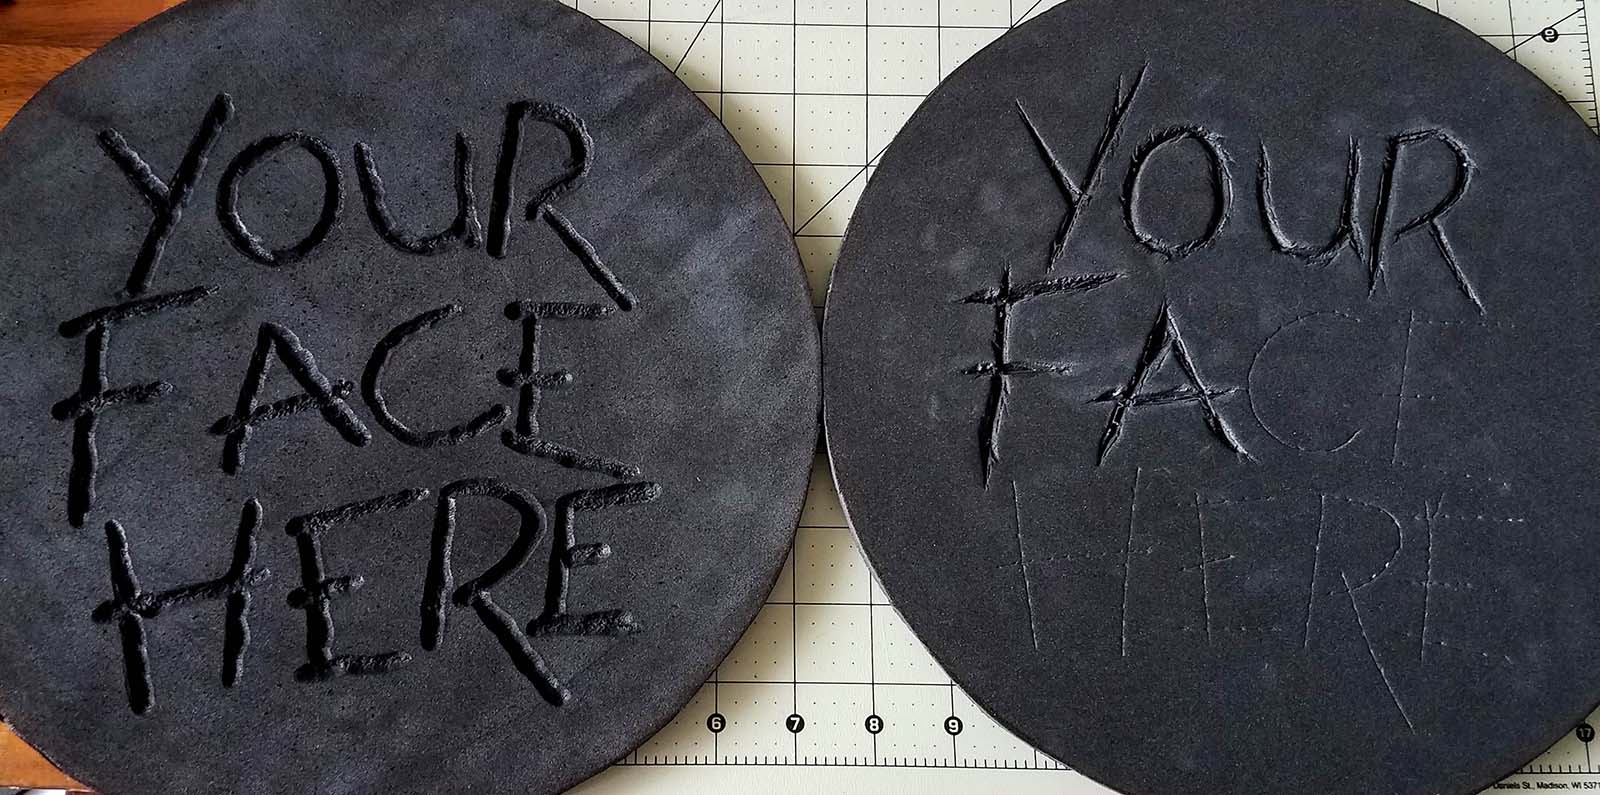
Then it was on to the ends. These are essentially just giant foam circles that fit inside the planks once everything is all put together. I did a bit of playing around just to see what looked best here for the text… on the left, the letters were ‘carved’ with a Dremel sanding bit and on the right they were carved with a razor blade. The results on the left were a bit too rounded and didn’t look like they would suit the overall look I was going for, so while it was a ton more work to do it by hand, I went with the razor. The other side was completed similarly and then everything was hit with the heat gun.
Finally I had the core pieces done! There was a fair amount of thought and work that went into the inside of this prop as I wanted the handle to be detachable for storage. Unfortunately I didn’t get a single picture of this part of the build though. Essentially, in the center of the inside of the hammer are two discs of foam that have a channel routed out of them. At the end of this channel, there is a threaded female end cap that is contact cemented in place. This allowed me to cement the male end onto a length of dowel that would be used for the handle so that I could easily screw it in or unscrew it as necessary. The handle itself was simply a 5 foot length of dowel that I picked up at the hardware store. It was cut to size and stained with some wood stain that was laying around the house.

After fitting everything together and gluing with a super strong contact cement, it dawned on me that I hadn’t altered the sizing from the template… which was intended for an adult. Whoops. Luckily, my daughter was still able to carry it, and in the end I think the over sized nature of the prop lent itself well to the character and look we were going for. Something about seeing this tiny girl wielding a giant hammer just felt appropriate. 😛

Once I figured out which side was going to be up I set about adding additional details to the surface. The scratches on the side were done with a razor and the white banding that was added is simply a couple of lengths of 2mm craft foam.
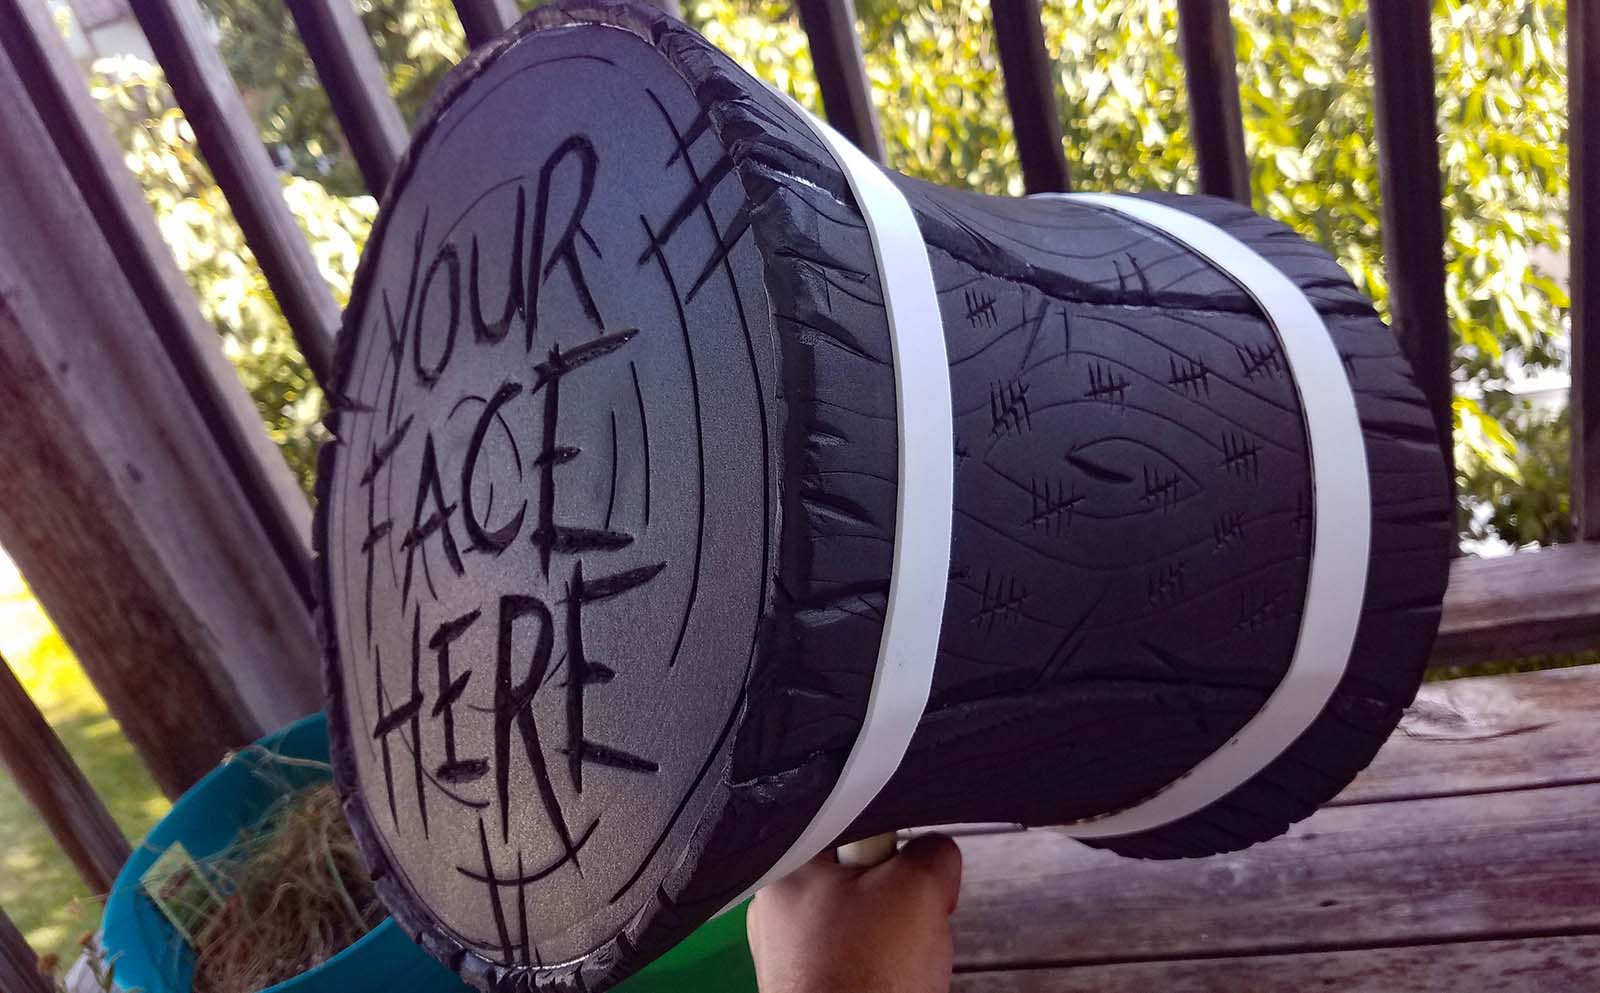
I wanted to add some form of detail to the bands themselves, and eventually I decided to simply make some bolt heads that would circle the hammer. These are just little circular pieces of foam that were cut by pushing a sharpened metal pipe into the foam until it cut a piece out. Once I had enough pieces, I added them around the hammer, but they were way too plain and boring looking. I used a sanding stone bit with the Dremel to give these a bit of a hammered look, and all in all I think the results turned out quite nicely.

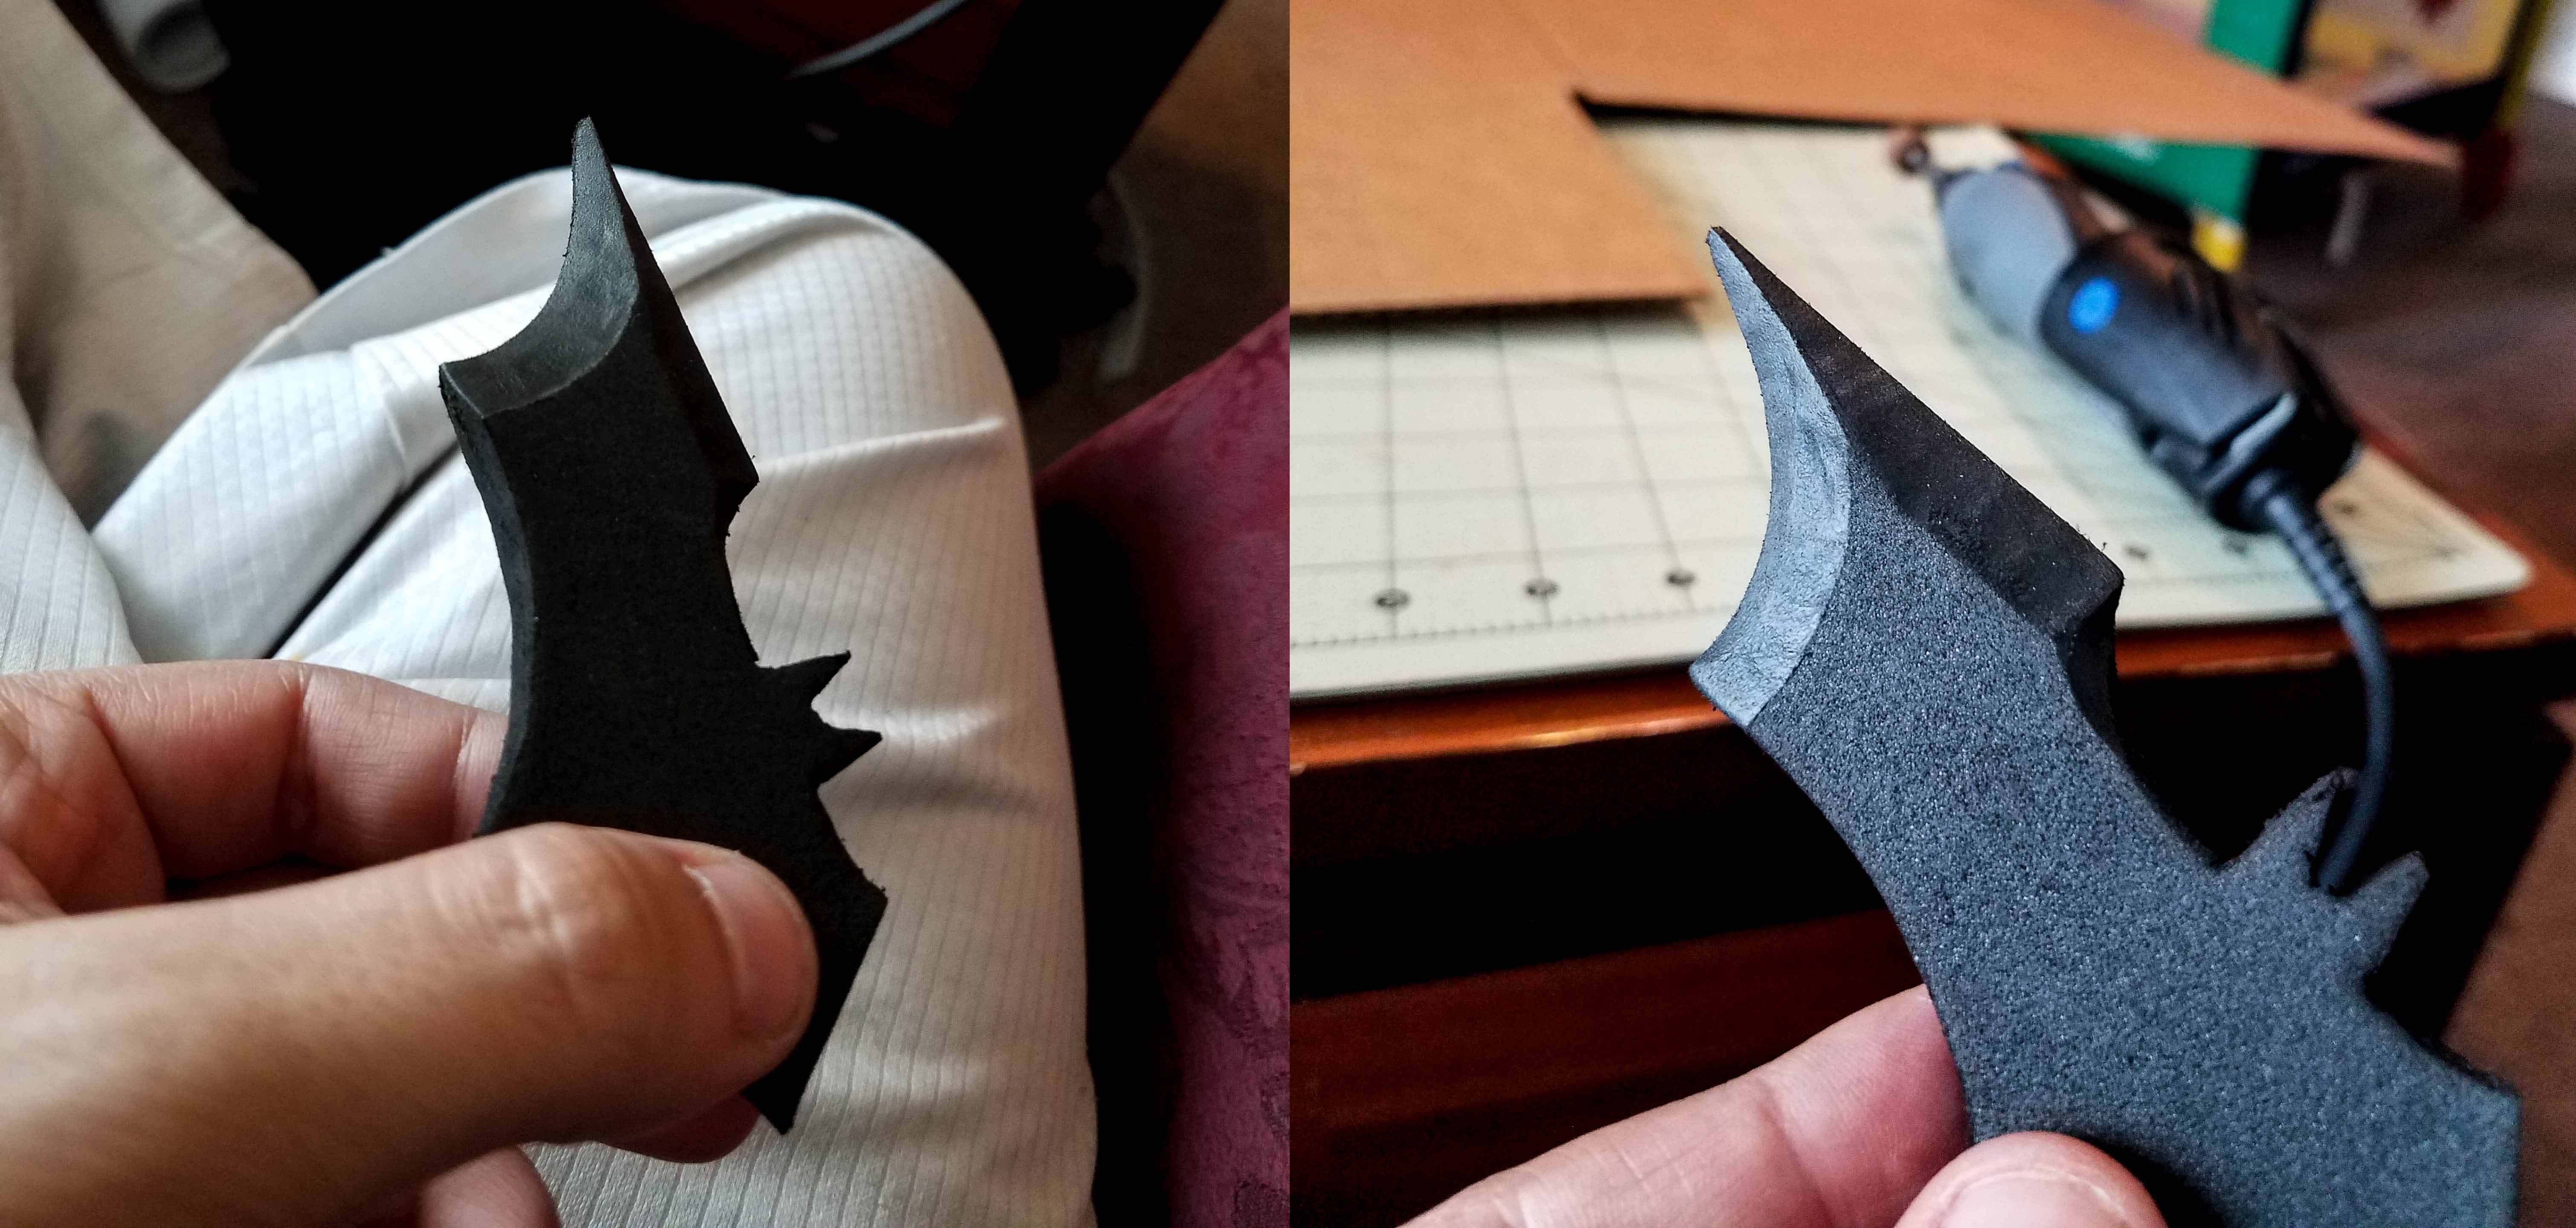
The Batarang was simply cut out of a piece of foam and then shaped with the Dremel. Nothing fancy, but it was a pain in the butt to get it looking like it wasn’t made of foam. My hands are far from steady enough to do this type of work all day, and I think I went through 4 or 5 test pieces before finally getting one that looked good.
After getting all the pieces to the point were I was satisfied that I didn’t need to add anything else, it was on to paint! Because foam will simply soak up stuff if it is not sealed, the sealing came first. The entire hammer got 4-5 coats of Plastidip and hung in my kitchen taped to some chairs for like 2 days while we packed a bunch of stuff.
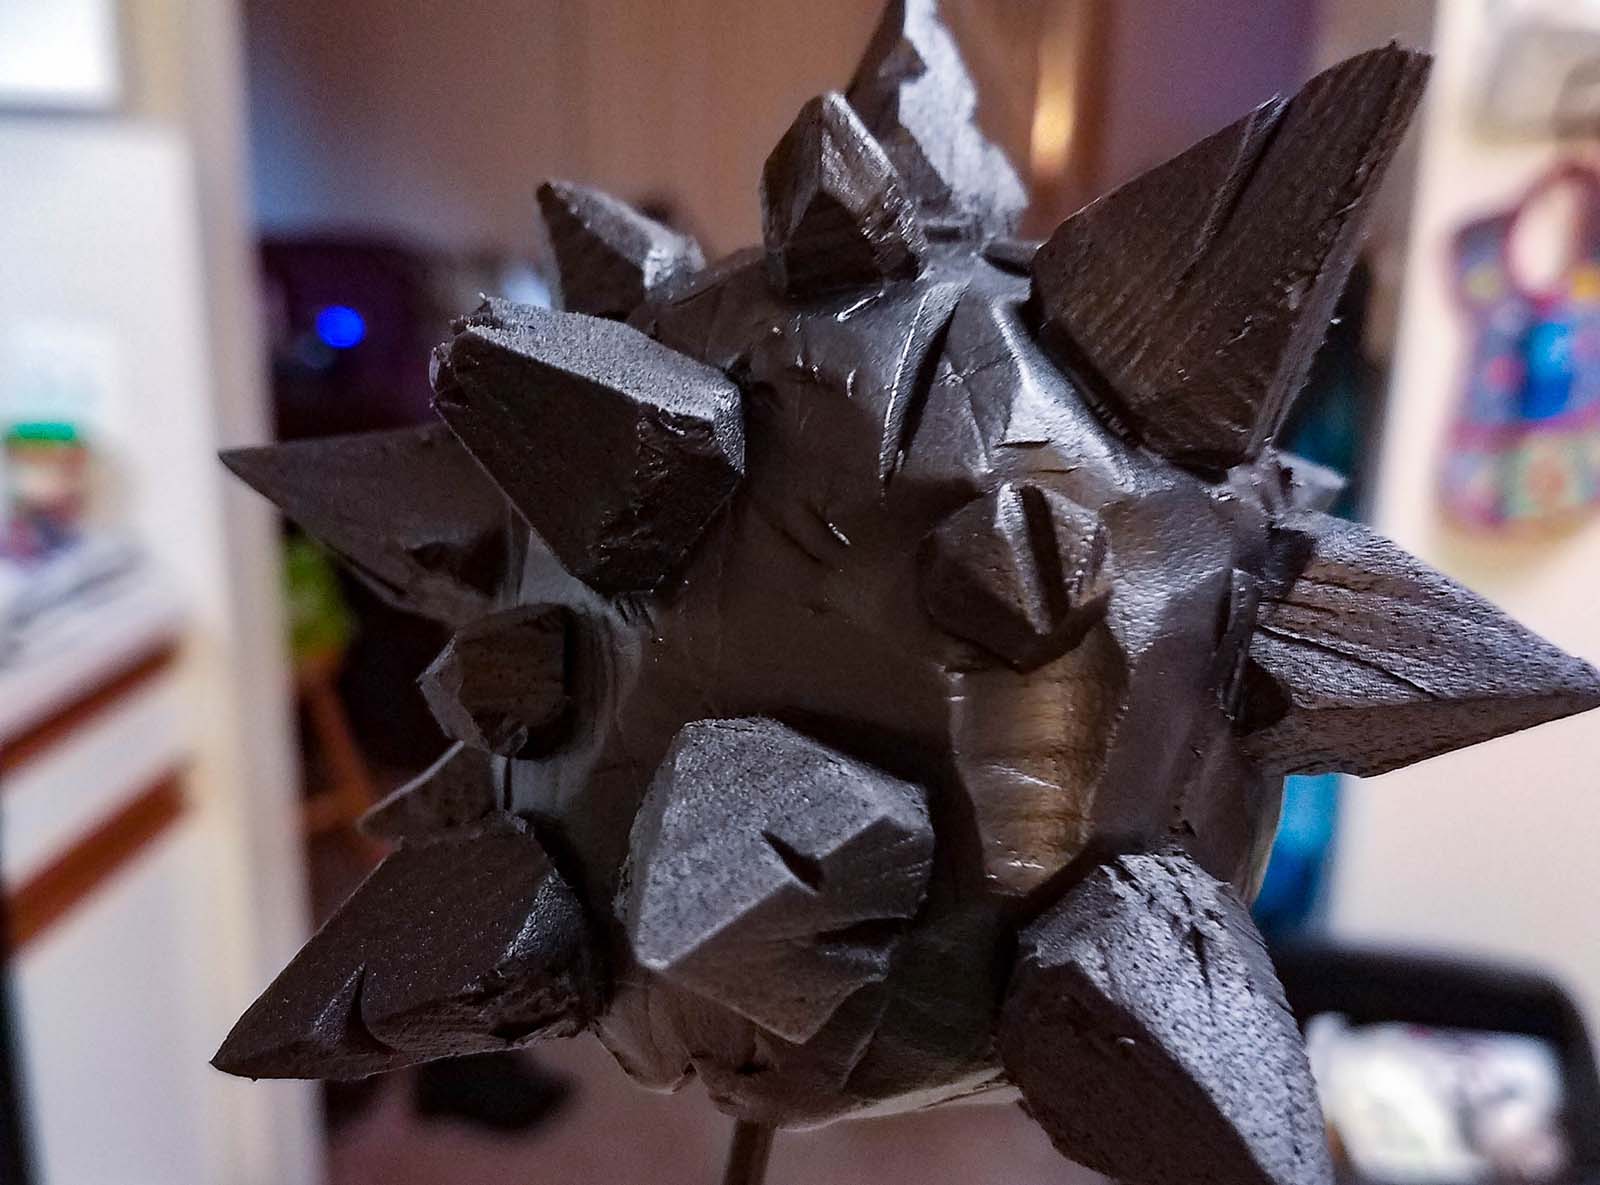
I decided to make a pommel for the base of the hammer’s handle so that I wouldn’t have to worry about finishing the wood. I started by cementing 5 square pieces of EVA foam to each other to make one big solid foam block. From there, I used my razor to cut and shave bits of this block off until it was roughly in the shape of a ball. I gouged it up to make it look worn and weathered, and even added a bit of grain texture here and there since I was planning for this piece to be painted as wood. I felt like it was a bit too plain in that form though, so I cut out a ton of little spike shapes from the EVA scraps that were all over my living room. After roughing them up a bit, cementing them to the ball, and sealing the entire thing, I had the base for the pommel!
Next came the fun stuff – paint! I had never painted anything to look like wood before, and I can’t honestly say that I feel like I did a great job. I think it serves its purpose, but it could certainly be better. The thing I found that worked best for me was simply using a ton of different coats with slightly different colors and building up the general look I was after. I used a lot of light and dark washes here and there, letting the paint dry completely at times and wiping it off of the surfaces at other times. I added highlights and shading here and there on the various pieces, and all totaled I think the paint job took about 20 hours or so (three full evenings of me sitting on the couch watching episode after episode of Dr Who).
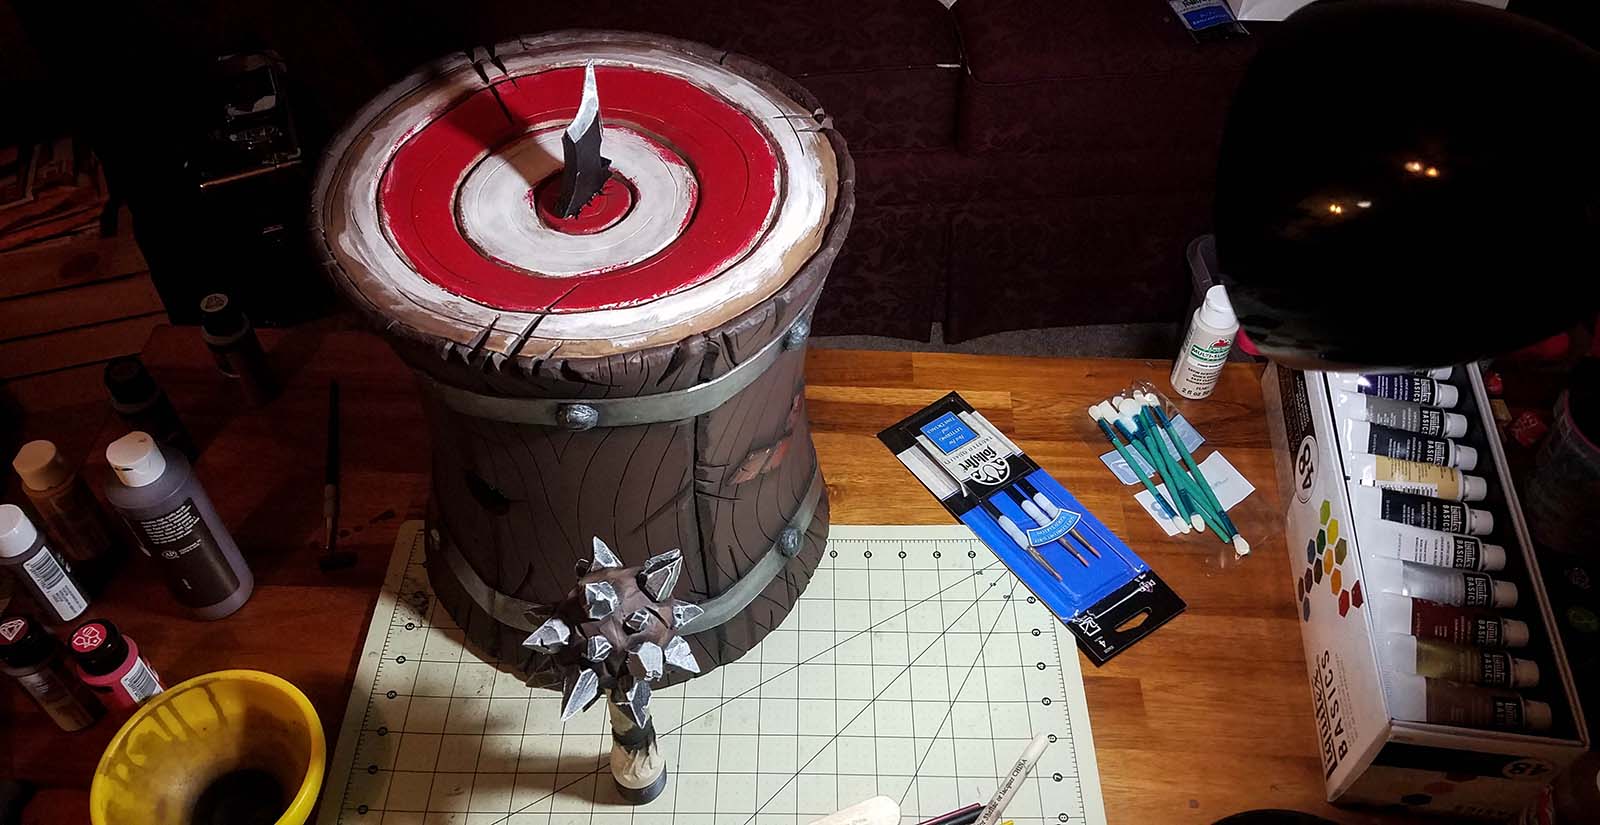

After all the paint was dry, I cut some strips of the crushed velvet material that I was going to be using for the costume’s dress and made a bit of a ribbon-sling-type of thing. I sewed a strip of red to a strip of black and then wrapped and cemented the strips to the ends of the handle, screwed everything together, and viola! The hammer was complete!
Now to meet my arch enemy… this damn sewing machine.
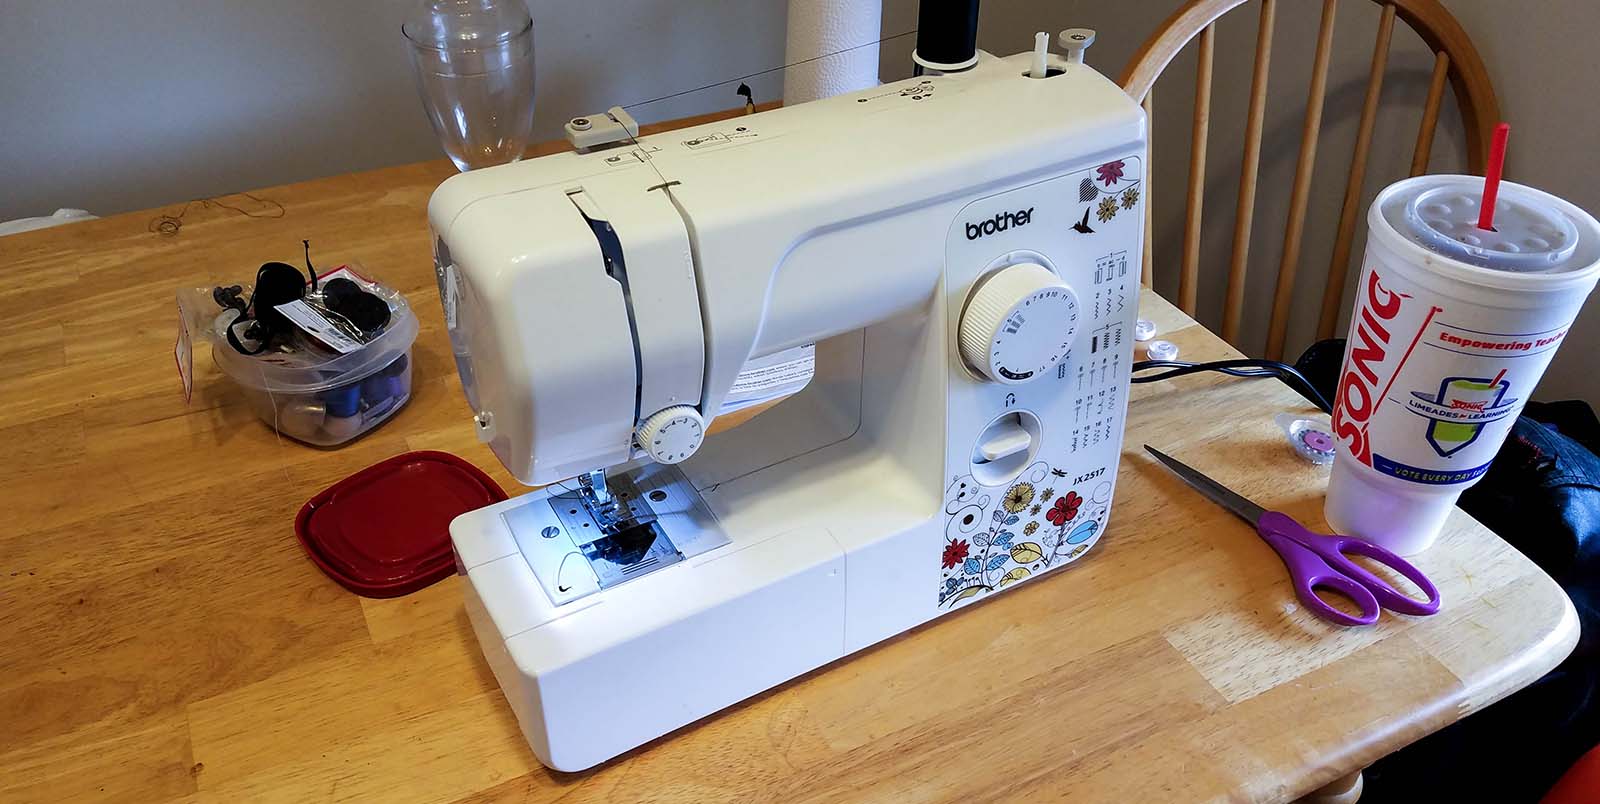
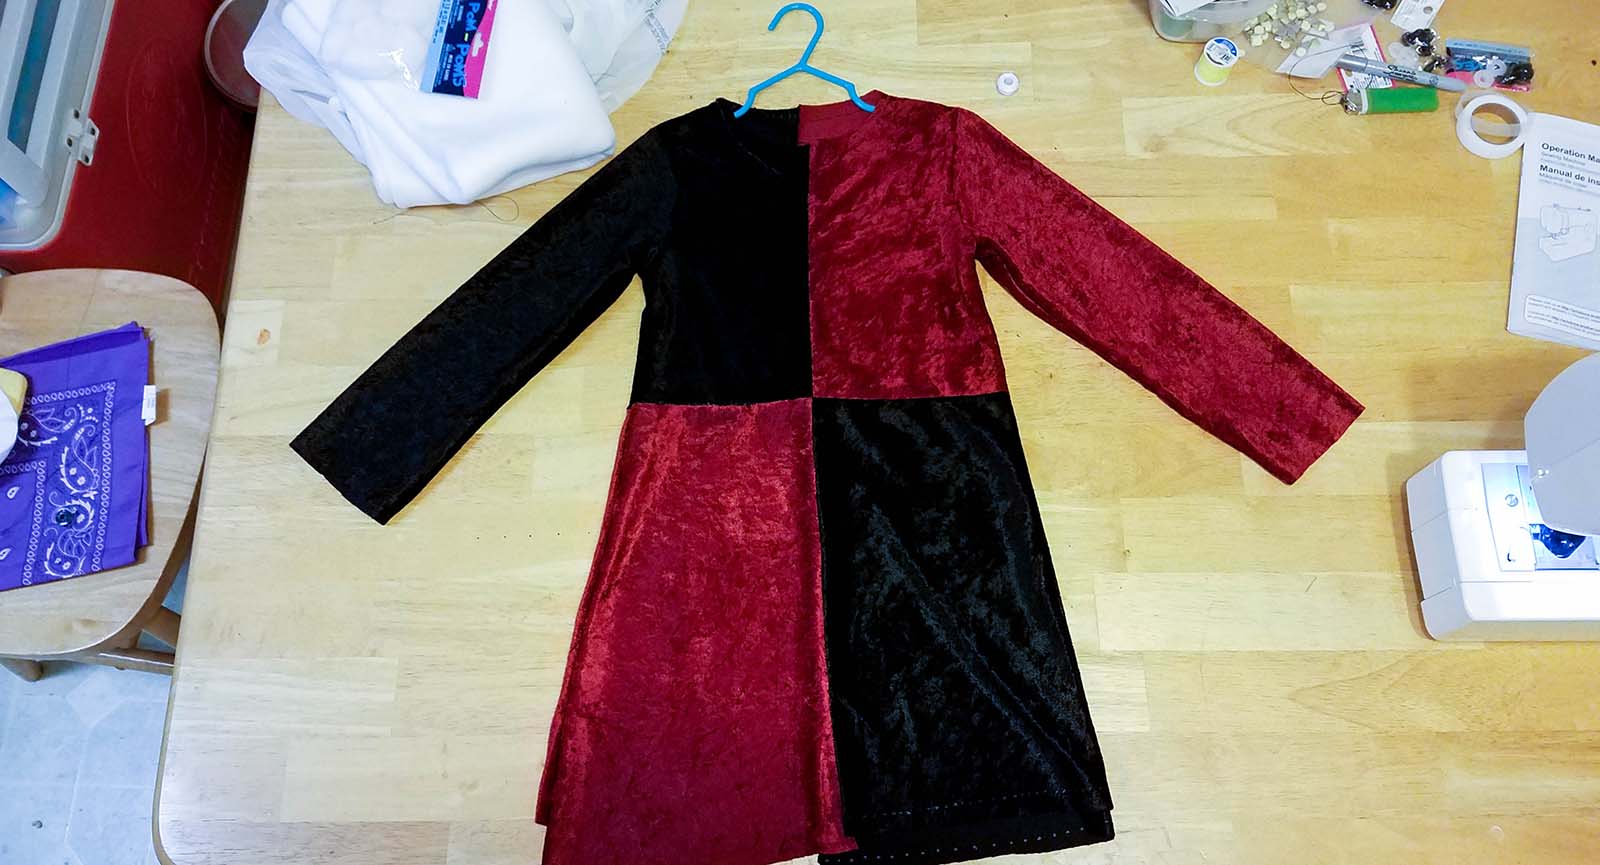
You guys… I am not a tailor. Truth be told, this costume was like the fourth thing I have ever sewed in my life. I did a bit of research into how to make patterns, and it all seemed like so much work. You gotta take a ton of measurements, get a 7 year old to stand still throughout all of them, hope she doesn’t grow any between the time that you take the measurements and the time that you finish sewing the thing… ugh. So exhausting. I found a better way. Go to the local Goodwill. Find a shirt that is roughly the size that you want the costume to be. Buy that shirt and take it home. Then rip all the seams out and cut it into the shapes you need for a pattern. Oh man… this saved me so much time. Eventually I will get around to learning how to actually do this stuff, but that time was not gonna be during the making of this costume.
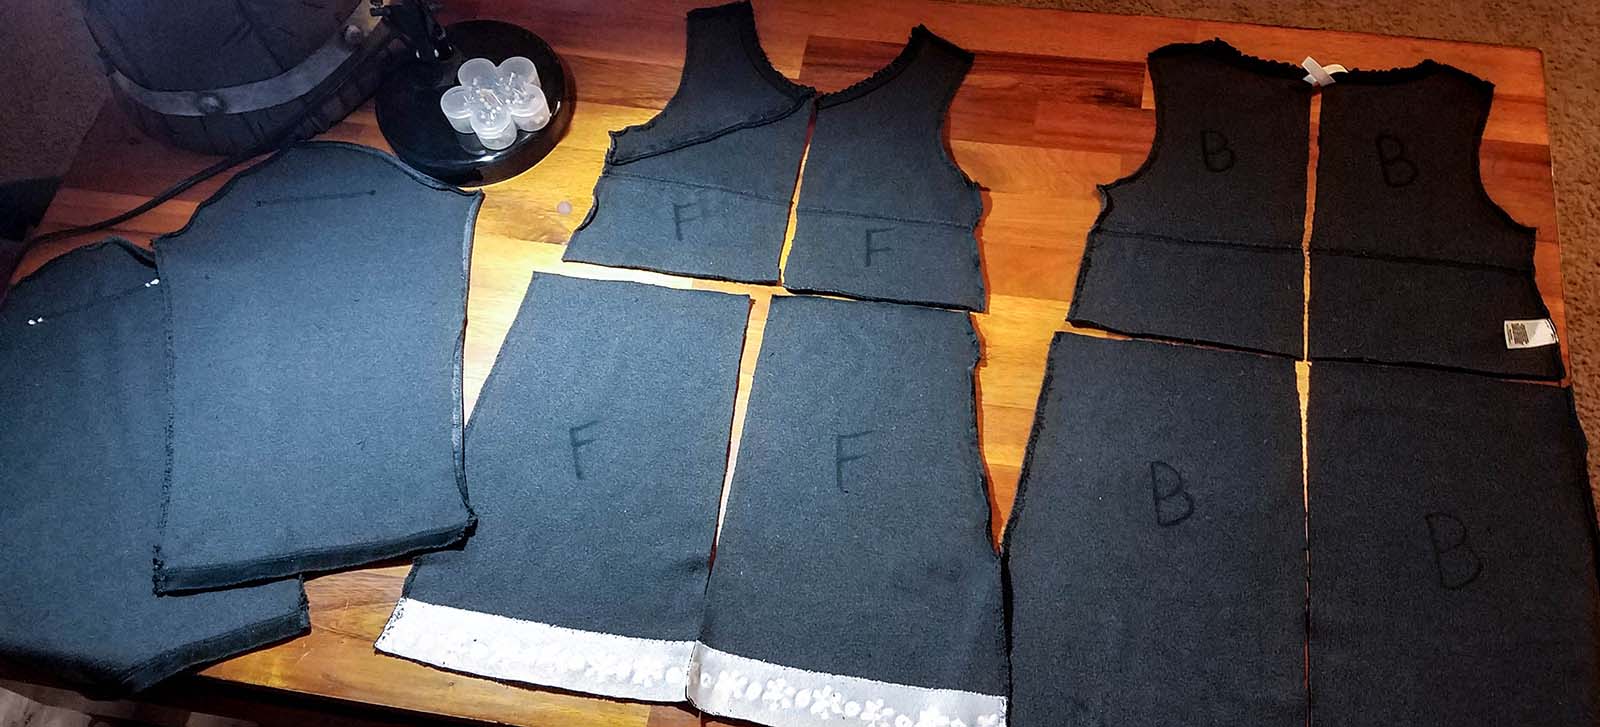
So, having ripped out the seams and figured out my pattern, I transferred everything over to the crushed velvet that I had picked up for the dress. Got everything cut out, spent 2 hours reading the sewing machine manual, and finally got the front stitched together from the back. Flip it over… and hey, it doesn’t look half bad.
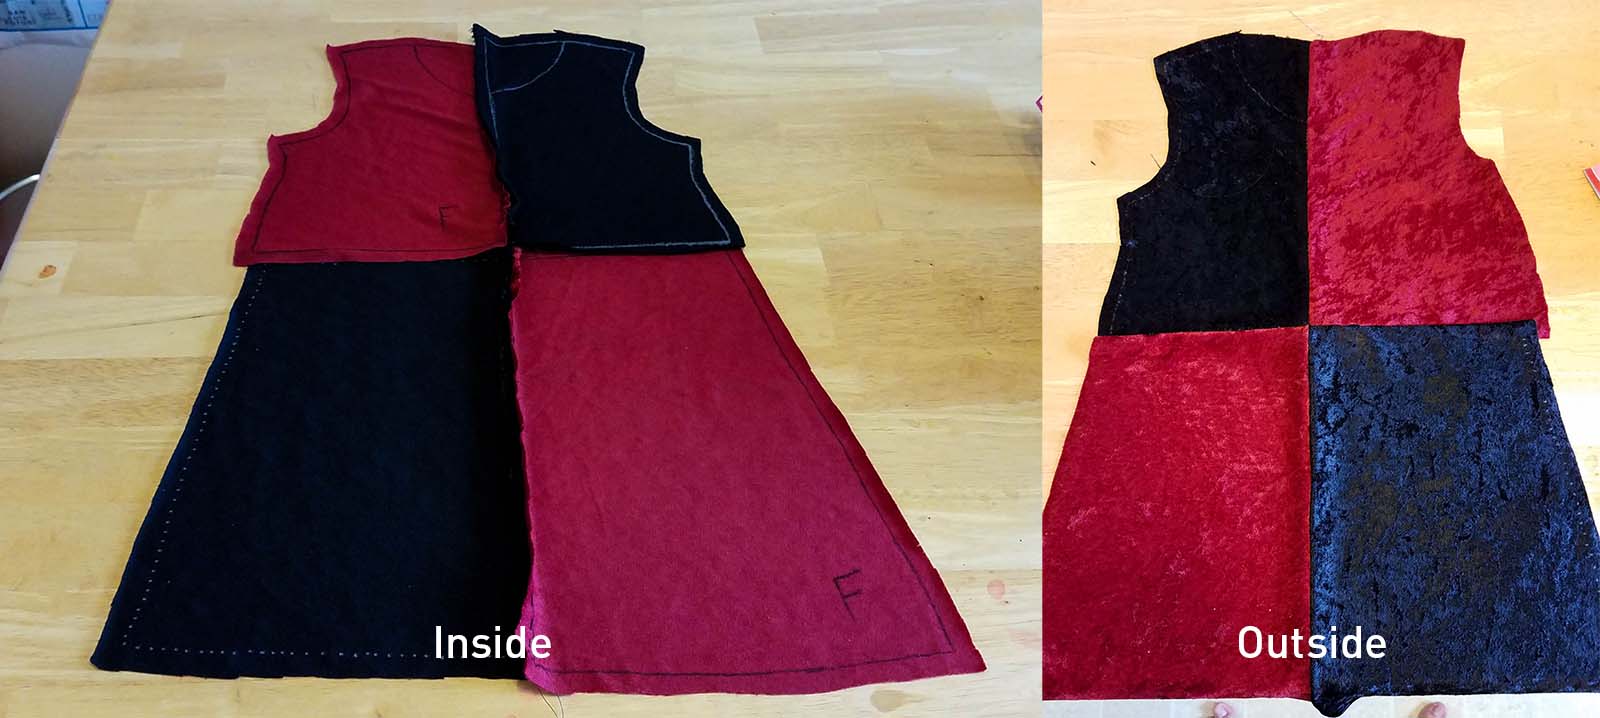
Repeat the process with the back and sleeves, stitch them all together, flip the thing inside out and OH MY GOD IT ACTUALLY LOOKS LIKE A DRESS!!! Seriously… I still have no idea how I did this on my first try.
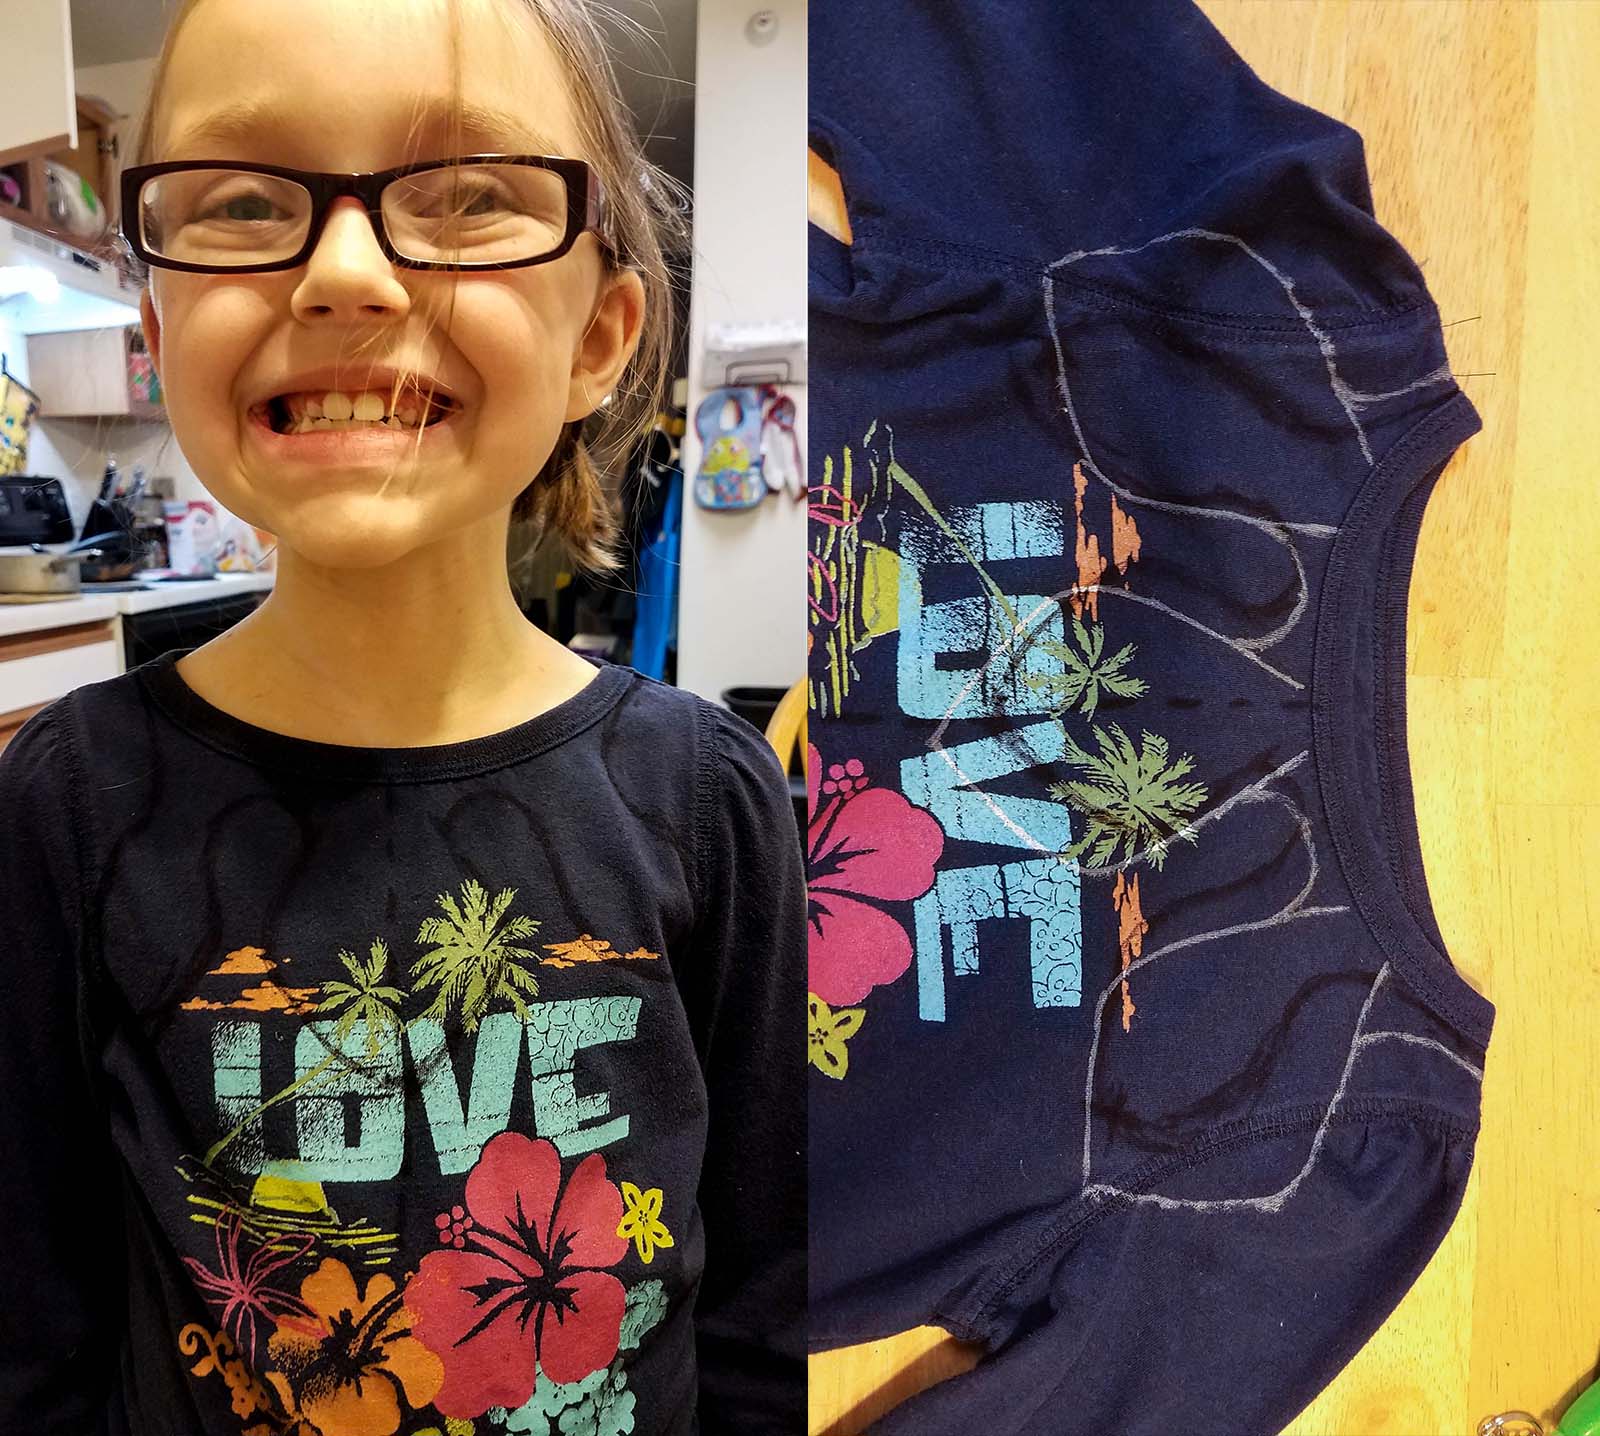
The whole thing needed to be hemmed everywhere, and there were various other little bits here and there that had to get made. I made a collar (again, using an old shirt that she had outgrown as the base for my template) and some arm cuffs out of white crushed velvet. These were pretty simple, just cut out the pattern twice and stitch it to itself. I added some velcro on one side of the collar so that it could be easily taken off and put on, and the cuffs had elastic bands in them so that they wouldn’t slip off of her wrists… all in all fairly easy stuff.
At the end of the day I spent a ton of time on this, but I think it was totally worth it. She loved this costume, and I think I learned a lot during the process. I just wish I’d had time to get more pictures of her in it before we had to pack it into a big box and stick it on a moving truck. Maybe we’ll dust it off one day soon though and get the camera back out. Until then… thanks for following along!